A Window-Sill Still Life for a Grey Afternoon
A window-sill still life turns three familiar objects and changing grey light into a quiet sketching session, with no special equipment or perfect drawing needed.
The common mistake with a window-sill still life is waiting for a sunny day, a tidy room or the right art supplies. That delay costs you the very thing this exercise offers: a small, quiet reason to look closely at the objects and light already around you. A grey afternoon is not a lesser version of the scene; its soft shifts can be easier to follow than sharp sunshine.
For this window-sill still life, choose three familiar objects, set them near a window and make a short sequence of sketches as the light changes. Use any paper and a pencil, or a pen if that is what you have. The aim is not to produce a polished picture. It is to notice what alters, what stays put and how your attention moves.
Choose three objects
Pick objects with different shapes and surfaces so they are easy to distinguish at a glance. A mug, a pear and a folded tea towel might work; so could a small jar, a wooden spoon and a book. Use things that are safe to rest on the sill and that you do not mind leaving there for a little while.
Try to include a mix: one rounded form, one with a clear edge, and one that can bend, fold or cast an interesting shadow. Avoid choosing three objects that are almost the same size and colour. Contrast gives your eye useful clues, even if your drawing stays loose.
Clear just enough space to arrange them. You do not need to remove every plant or stack of post. A little visual clutter in the room is fine; the small group is your subject. If the sill is narrow, place the objects on a nearby table beside the window instead.
Set the small stage
Put the objects close enough together that they feel like a group, but leave a little air between their outlines. Turn the mug so its handle can be seen. Let the towel overlap one edge of the book, or place the pear slightly forward. Small overlaps help you judge which object sits in front without adding anything complicated.
Stand or sit where you can see the whole arrangement without leaning into an awkward position. Keep your viewpoint for the session. If you move, the apparent shapes and overlaps change, so a sketch made later may no longer match the earlier one for reasons beyond the light.
Look at the window as a light source. Notice which side of each object is brighter, where the shadow falls, and whether the glass seems to soften the scene. On a grey afternoon, the difference between light and shade may be gentle. You can still see it by comparing one surface with another, rather than searching for a dramatic dark patch.
Make the first sketch
Before drawing details, take a quiet look around the arrangement. Notice its outer shape: perhaps the mug rises above the book, while the towel spreads sideways. Then make a few light marks to place the objects on the page. Indicate their broad outlines and the gaps between them.
Keep the first sketch small. A postcard-sized area is enough, and a few minutes of looking can be more useful than a long attempt to make every contour exact. Draw the mug’s oval opening as you see it from your seat, not as you think a mug should look. Let the pear be lopsided if that is what the view gives you.
Now add one or two details that help distinguish the objects: the mug handle, the fold in the towel, the book’s page edge. Leave decoration and tiny surface marks for later. A sketch is a record of what caught your eye, not an inventory of everything present.
Track the changing light
Leave the arrangement untouched and return to it after a short interval. Make another sketch beside the first, keeping roughly the same size and viewpoint. You do not need to work to a timer; simply pause, make a cup of tea or read a page, then look again.
Compare the two views before you start drawing. Has the shadow under the mug softened or shifted? Does the pear’s bright side look less distinct? Perhaps nothing obvious has changed. Record that too: the scene can remain visually steady while your attention picks out a new detail.
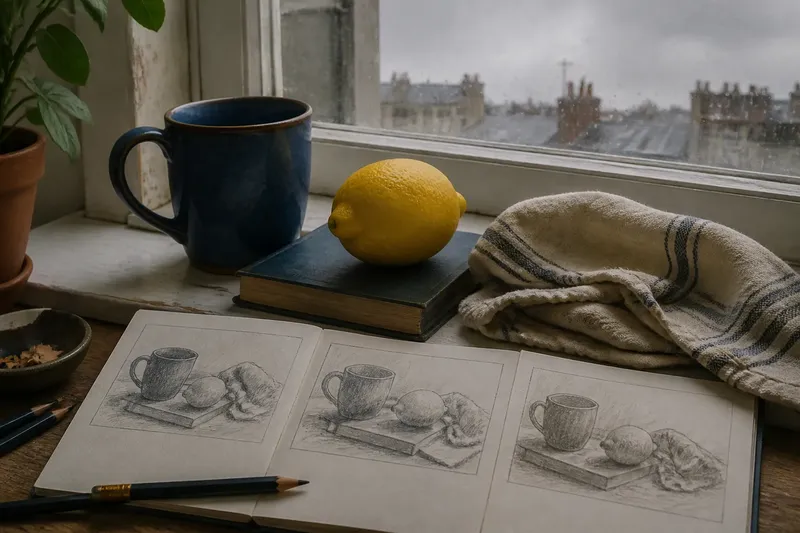
Make a third sketch if you feel like continuing. You might focus this time on the cast shadows, or on the shapes of the spaces between objects. Changing your focus gives each drawing a purpose without requiring a new arrangement. Think of the sketches as pages in a small weather diary: each one holds a moment, not a final verdict on your skill.
What should you draw first?
Should I draw the outlines or the shadows?
Start with the broad outlines and the spaces between the objects, then add shadows if they help explain the forms. If the shadows are the part that changes most, make them the focus of a later sketch.
What if my objects look wrong?
Check the angle of the mug opening, the direction of the book’s edges and the gaps between the objects. Adjust one relationship at a time rather than erasing the whole drawing.
Do I need to use pencil?
No. A biro, coloured pencil or soft graphite all work on ordinary paper. Choose a tool that feels easy to pick up, not one that makes you worry about keeping the page pristine.
What if the light barely changes?
Look for subtler differences in softness, reflected light or the edge of a shadow. If the scene stays much the same, make your next sketch about a different feature instead.
Compare without judging
Lay the sketches side by side and look for one specific change. Perhaps the mug seems to lean in one drawing because its opening is more tilted, or the towel’s fold has become easier to see. Rather than deciding which page is best, ask what each one helped you notice.
Say you have arranged a blue mug, a lemon and a folded cloth on the sill. In the first sketch, you might concentrate on how the lemon overlaps the mug’s base. After pausing, you notice a soft shadow extending across the cloth, so the next sketch gives that shape more space. The observable result is a pair of different records of the same arrangement, each attentive to a different feature.
For an easy comparison, mark each sketch with a small note such as “mug handle” or “soft shadow”. These labels are for your own memory, not explanations you need to show anyone. If one drawing feels clumsy, look for a useful observation in it: a convincing curve, a clear gap or a shadow placed in the right direction.
Keep the exercise gentle
Stop when your attention begins to wander or when the light changes enough that you can no longer see the same arrangement clearly. Put the objects back where they belong and keep the sketches together if you want to return to them. There is no need to finish, shade every surface or turn the page into a finished artwork.
If you repeat the exercise on another afternoon, change just one element: choose a different group of objects, sit at another window or use a different drawing tool. Keeping the rest familiar makes it easier to notice what that single change does to the scene.
A window-sill still life can fit between ordinary tasks: three objects, a patch of paper and a few returns to the page. Keep the sketches as small records of looking, and let the grey light set the pace rather than asking it to provide a grand subject.